
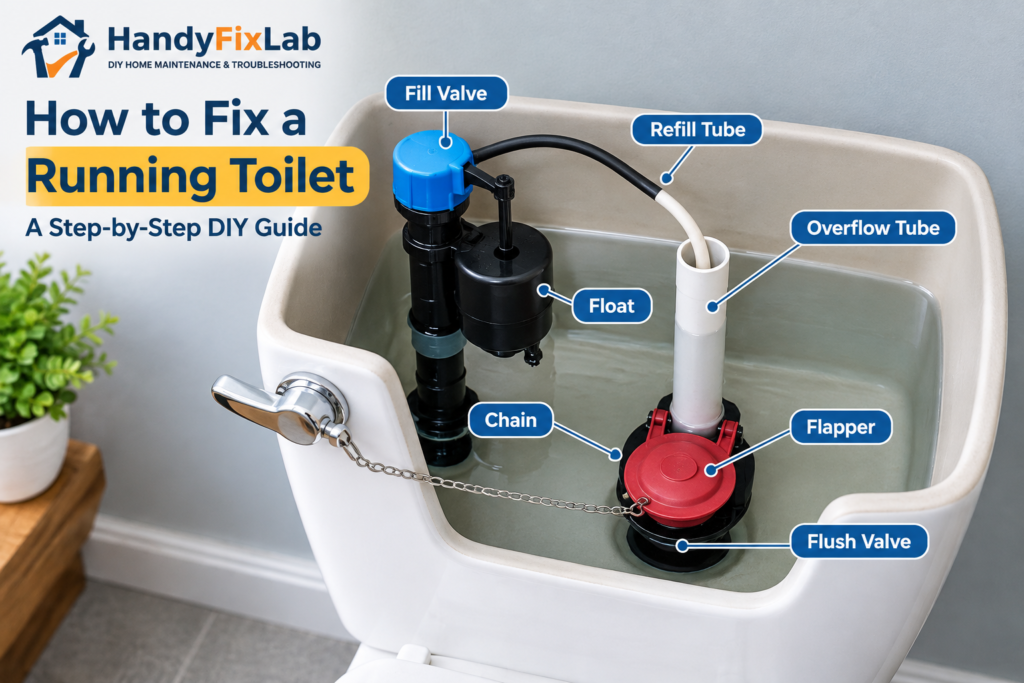
A toilet that keeps running after you flush is more than an annoying sound. It can waste water and may indicate a worn or misadjusted part inside the tank.
The good news is that most running toilets can be diagnosed and fixed without replacing the entire toilet. Common causes include a worn flapper, a misadjusted chain, an incorrect water level, or a faulty fill valve.
In this guide, you’ll learn how to fix a running toilet step by step, starting with a quick diagnosis so you can identify the problem before replacing any parts. If you want to fix a running toilet, start by identifying where the water is going before replacing any parts.
First, Find Out Why Your Toilet Is Running
Before changing anything, remove the tank lid and watch what happens after you flush.
A toilet should flush normally, refill the tank, stop filling when the water reaches the correct level, and remain quiet until the next flush.
If you hear hissing, trickling, or continuous water flow after the tank has refilled, use this quick diagnostic guide:
| What You Notice | Likely Cause |
| Water slowly trickles into the bowl | Worn or poorly sealing flapper |
| Toilet refills by itself every few minutes | Slow leak from the flapper or flush valve |
| Water keeps entering the tank | Float or fill valve problem |
| Water rises into the overflow tube | Water-level or fill-valve problem |
| Handle must be jiggled to stop the water | Chain, handle, or flapper alignment |
Starting with the symptom can save you from replacing a part that is still working properly.
Estimated Repair Time and Cost
Most simple running-toilet repairs can be completed fairly quickly.
| Metric | Typical Estimate |
| DIY repair time | 15–30 minutes |
| Common replacement part | Flapper or fill valve |
| DIY parts cost | Often relatively inexpensive |
| Professional repair | Cost varies by location and the problem |
Part prices and plumber rates vary considerably by toilet model, location, and the type of repair, so treat these as general guidance rather than fixed prices.
What You’ll Need
You may not need all of these items:
- Towel or sponge
- Rubber gloves
- Food coloring for leak testing
- Small bucket
- Adjustable wrench
- Replacement toilet flapper, if necessary
- Replacement fill valve, if necessary
Start with diagnosis before buying replacement parts. For other simple household fixes, explore our General Home Repair guides.
Step 1: Check the Flapper
The flapper is the rubber seal at the bottom of the toilet tank. It lifts when you flush and closes afterward to keep water inside the tank.
If the flapper becomes worn, warped, damaged, or covered with mineral buildup, it may not seal properly. Water can then slowly leak from the tank into the bowl.
A worn or poorly sealing flapper is one of the most common causes of a running toilet. The U.S. Environmental Protection Agency (EPA) recommends checking toilet flappers as part of regular leak detection and maintenance.
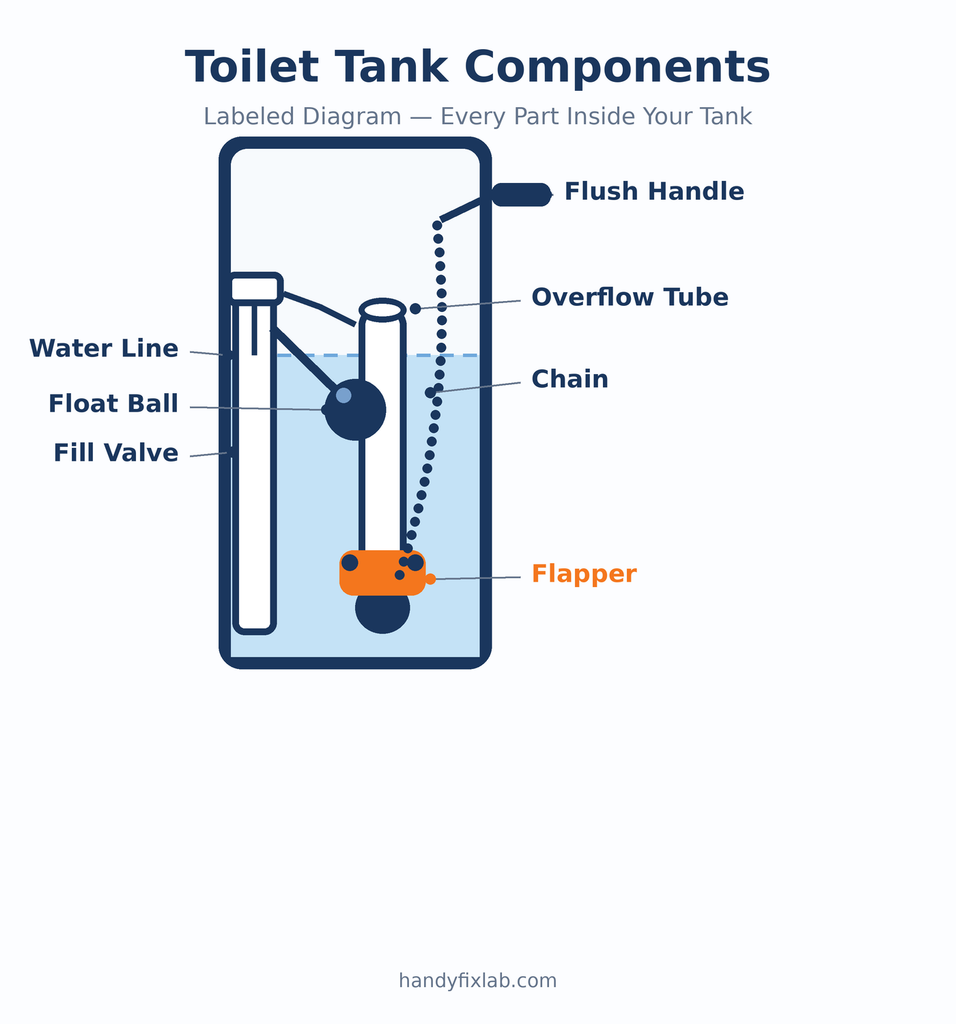
Try this quick check
With the tank full, carefully inspect the flapper.
Make sure it:
- Sits flat against the flush valve
- Is not cracked or deteriorated
- Is free of excessive mineral buildup
- Closes completely after flushing
- Is not being held open by the chain
If gently pressing the flapper down by hand stops the water flow, the flapper may not be sealing correctly.
Step 2: Perform the Food-Coloring Test
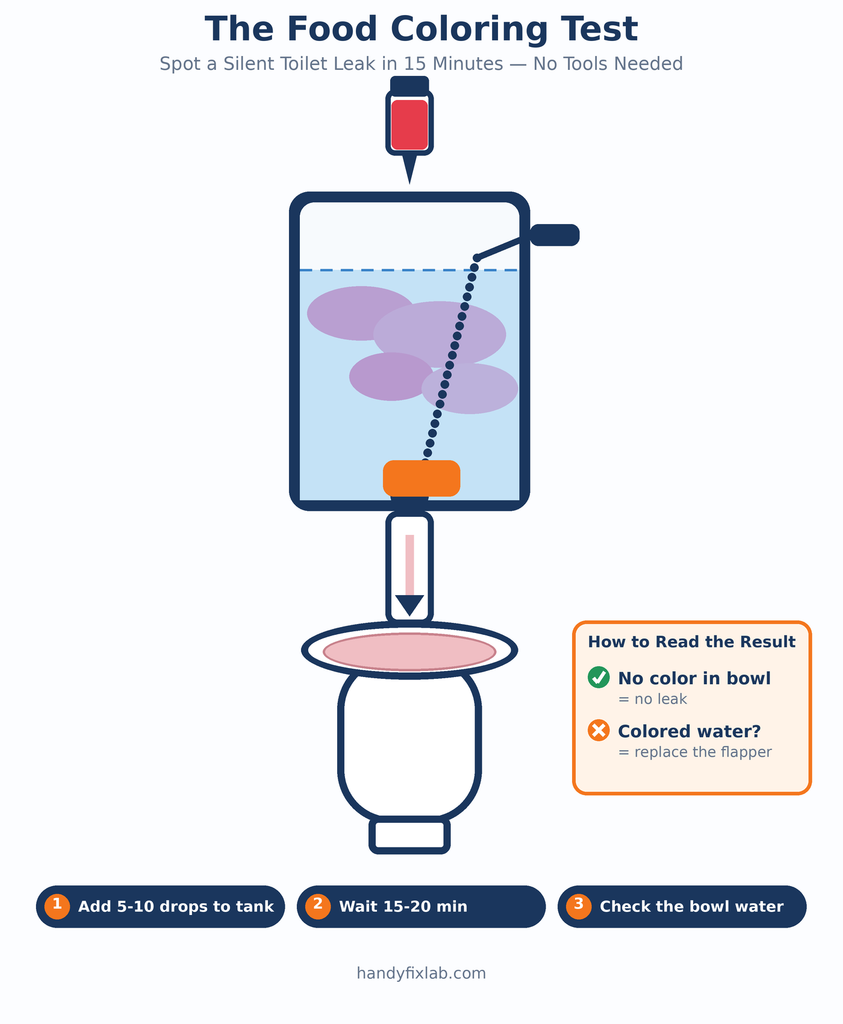
If you’re not sure whether water is leaking silently from the tank into the bowl, try a simple dye test.
- Remove the toilet tank lid.
- Make sure the toilet is not being flushed.
- Add several drops of food coloring to the tank water.
- Wait about 10–15 minutes.
- Check the toilet bowl.
If colored water appears in the bowl without flushing, water is leaking from the tank into the bowl.
The EPA recommends this type of dye test for detecting silent toilet leaks. Flush the toilet after the test to clear the coloring.
If the test confirms a leak and the flapper is worn, replacing the flapper is a good place to start.
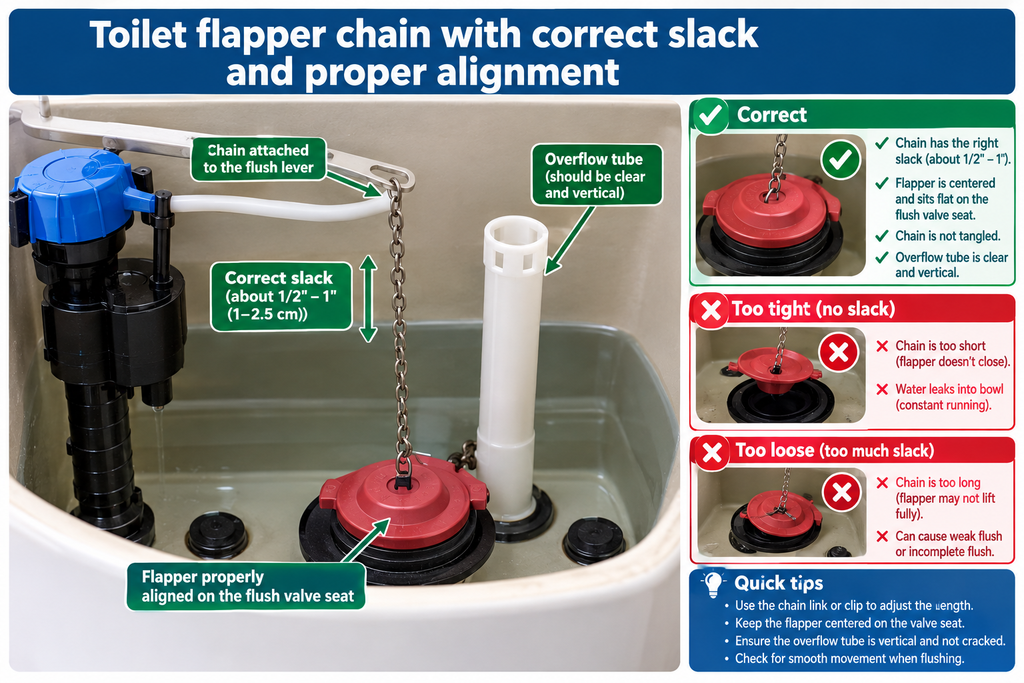
Step 3: Check the Flapper Chain
The chain connects the flush handle to the flapper.
It needs to have enough slack for the flapper to close completely, but not so much that the handle cannot lift it properly.
If the chain is too loose
The flush handle may not lift the flapper enough for a complete flush.
What to look for
- A chain that is too tight
- Excessive slack
- A tangled chain
- A chain caught underneath the flapper
- A flush handle that does not move freely
Make a small adjustment if necessary, then flush the toilet and watch the flapper close.
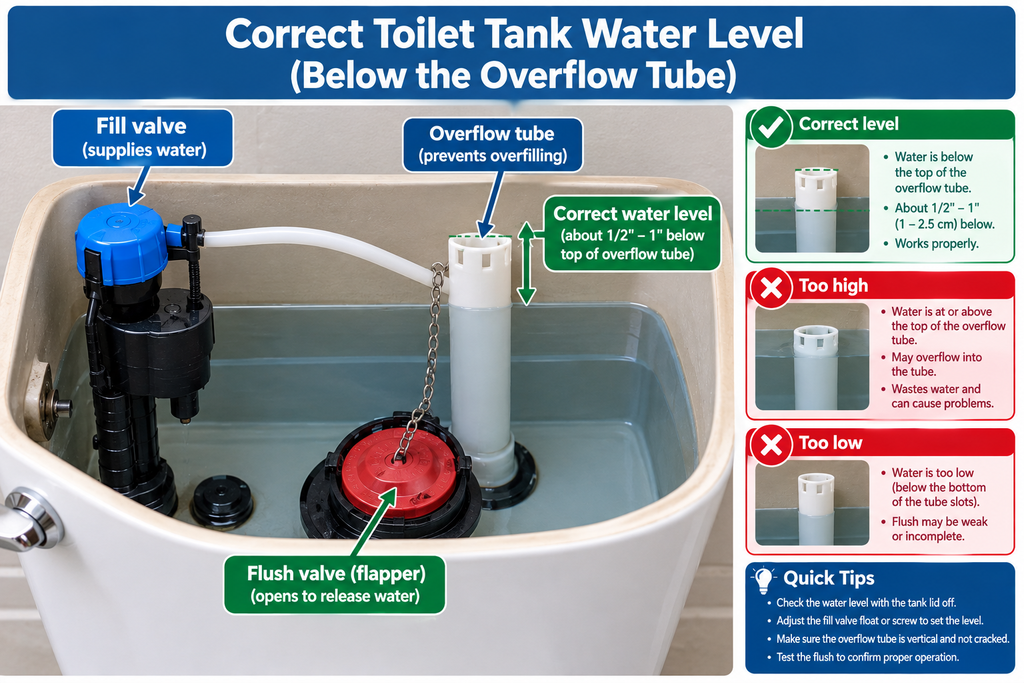
Step 4: Check the Water Level
Find the vertical overflow tube inside the tank.
The water should stop below the top of the overflow tube. Many toilets also have a marked water line inside the tank that indicates the correct level.
If water continues flowing into the overflow tube, the tank may be filling too high.
This can point to a problem with the:
- Float
- Fill valve
- Water-level adjustment
Do not assume that every toilet uses exactly the same water level. Follow the water-level mark or manufacturer’s instructions for your particular toilet whenever available.
Step 5: Check the Float and Fill Valve
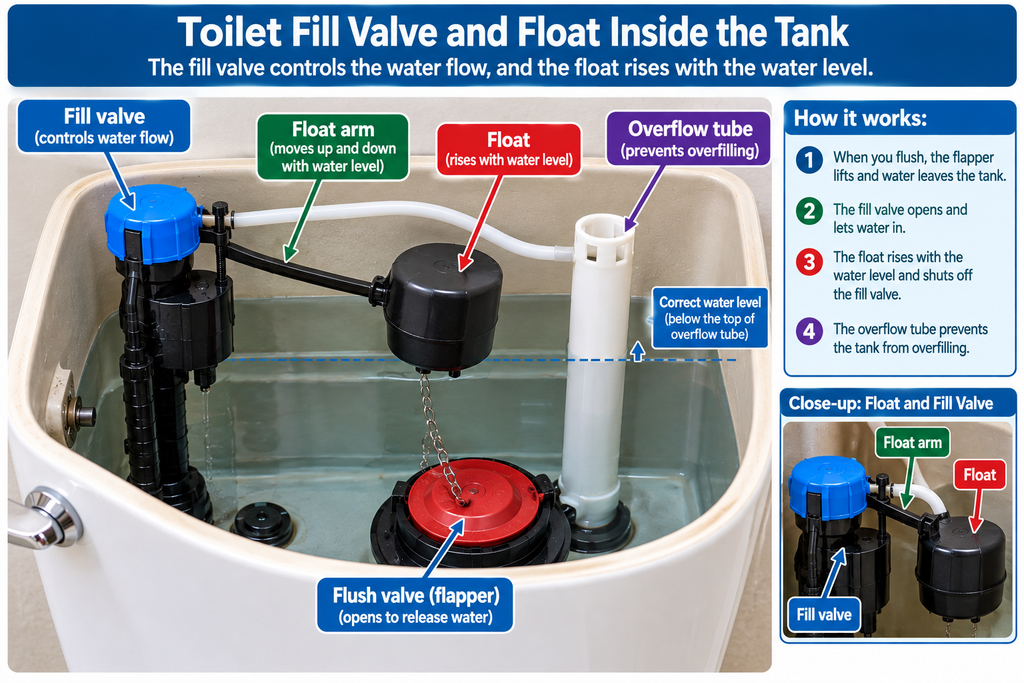
The fill valve controls the flow of fresh water into the toilet tank.
The float signals the fill valve when the tank has reached the desired water level.
While the toilet is filling, carefully lift the float.
If the water stops
The float may be set too high or may need adjustment.
Depending on the toilet design, you may be able to adjust it using a screw, clip, or another mechanism on the fill valve.
If the water does not stop
The fill valve may be worn or faulty and may need cleaning or replacement.
Different toilets use different fill-valve designs, so check the manufacturer’s instructions before making adjustments.
Step 6: Check the Refill Tube
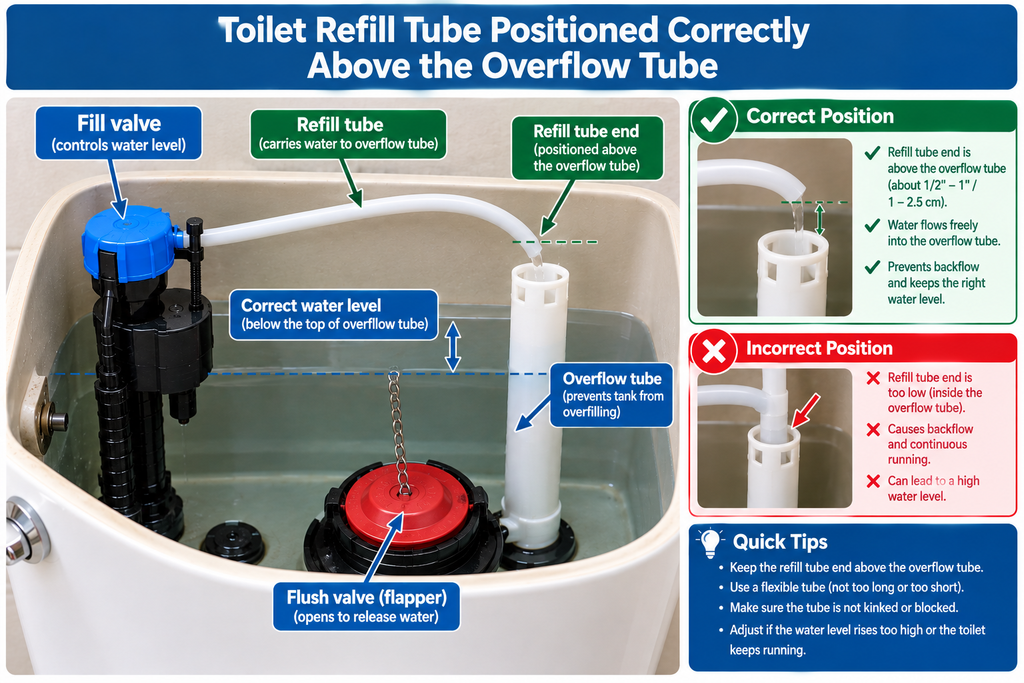
Inspect the small refill tube that runs from the fill valve toward the overflow tube.
The refill tube should be positioned according to the fill-valve manufacturer’s instructions and should not be pushed deeply down inside the overflow tube.
An incorrectly positioned refill tube can contribute to siphoning and abnormal water flow.
If the tube is loose, make sure its clip is secure and that the tube is positioned correctly.
Step 7: Replace a Worn Flapper
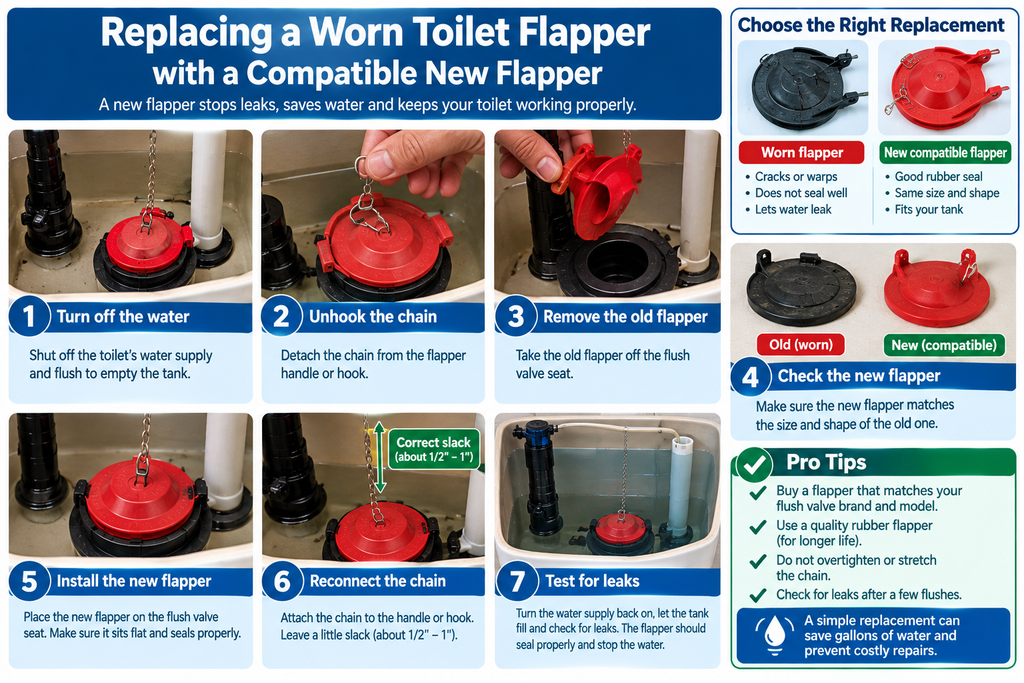
If the dye test confirms a tank-to-bowl leak and the flapper is damaged or worn, replacing it is often a straightforward DIY repair.
How to Fix a Running Toilet: Replace the Flapper
- Turn off the toilet’s water supply using the shutoff valve near the toilet.
- Flush the toilet and hold the handle down to drain most of the tank.
- Remove any remaining water with a sponge or towel.
- Disconnect the chain from the flush lever.
- Remove the old flapper from its mounting points.
- Clean the sealing area around the flush valve.
- Install the new flapper.
- Reconnect the chain with a small amount of slack.
- Turn the water supply back on.
- Allow the tank to fill.
- Flush the toilet and check for leaks.
Make sure the replacement flapper is compatible with your toilet.
If possible, take the old flapper with you when purchasing a replacement or check the toilet’s brand and model.
Not all toilets use the same flapper design or size.
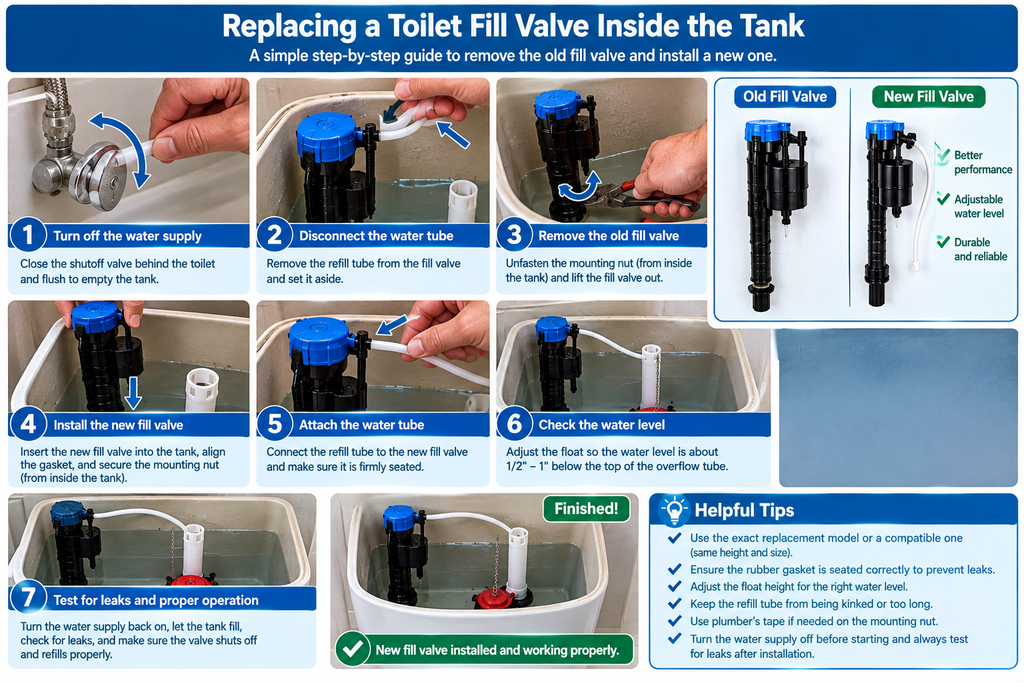
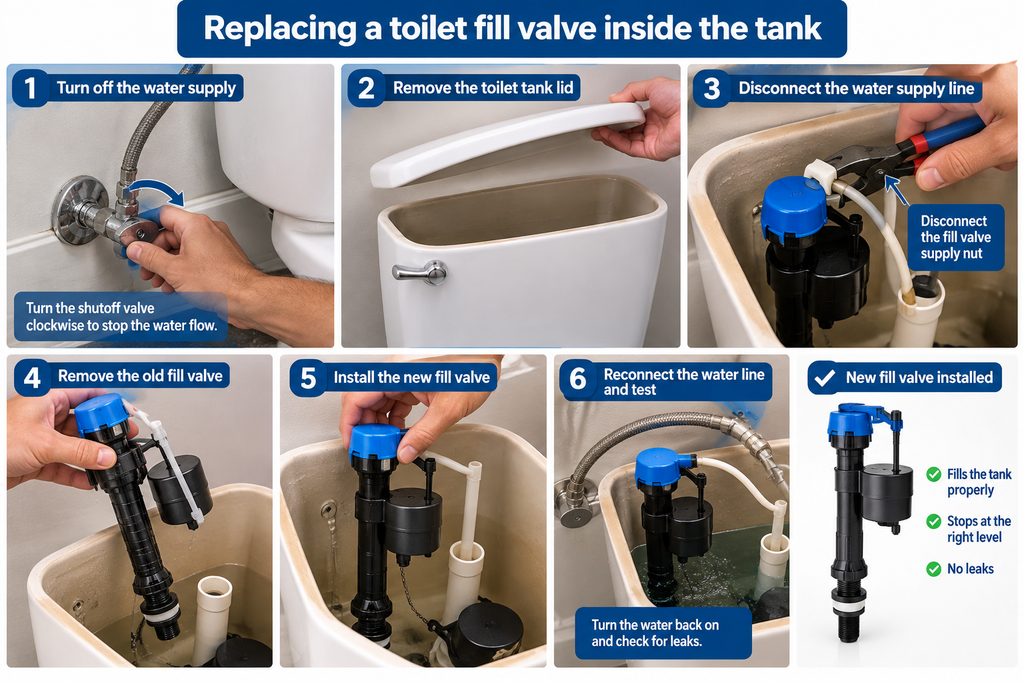
Step 8: Replace the Fill Valve if Necessary
If the flapper seals properly but water continues entering the tank, the fill valve may need to be replaced.
How to replace a toilet fill valve
- Turn off the water supply.
- Flush the toilet to empty the tank.
- Remove the remaining water with a sponge or towel.
- Disconnect the water supply line underneath the tank.
- Remove the nut securing the fill valve.
- Lift out the old fill valve.
- Clean the area around the opening.
- Install the replacement fill valve according to its instructions.
- Reconnect the water supply line.
- Turn the water back on.
- Adjust the water level according to the manufacturer’s instructions.
- Flush the toilet several times and check carefully for leaks.
Avoid overtightening plastic fittings.
If the existing fill valve can be cleaned according to its manufacturer’s instructions, cleaning it may solve the problem without replacement.
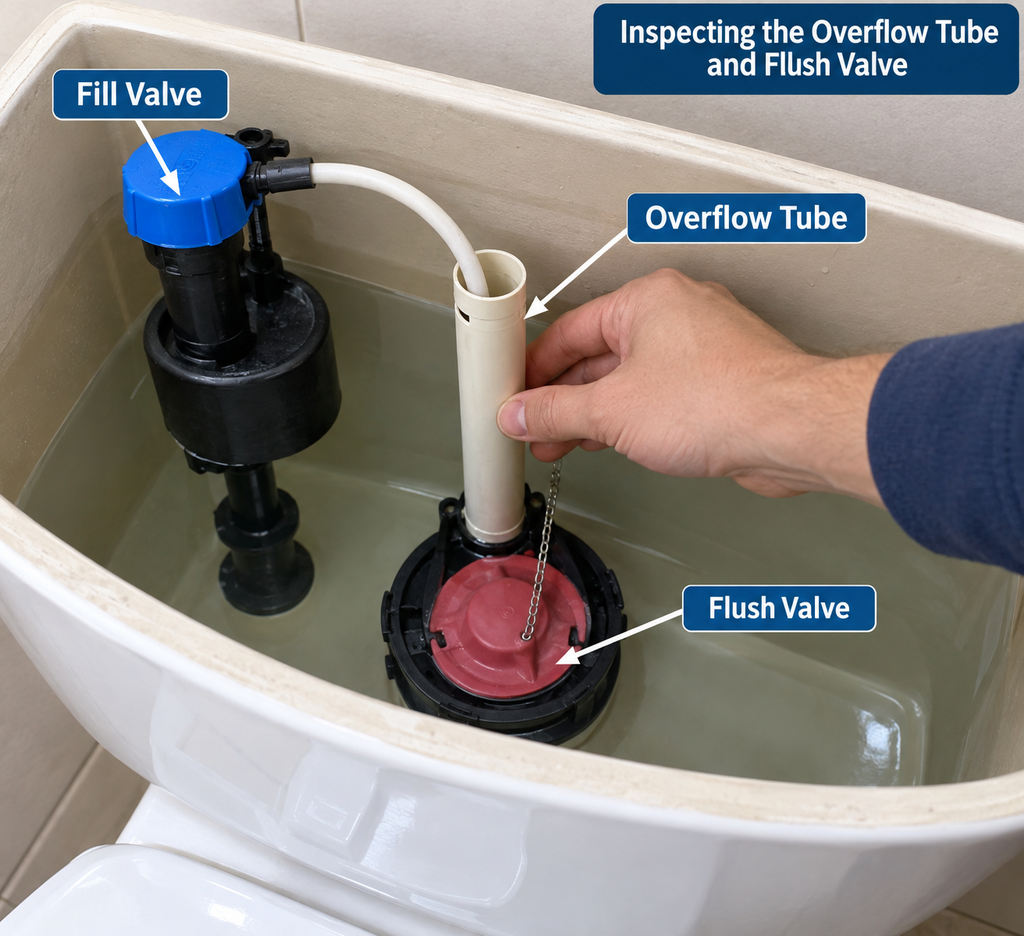
Step 9: Inspect the Overflow Tube and Flush Valve
If the toilet continues running after checking the flapper, chain, water level, and fill valve, inspect the other components inside the tank.
Look for:
- Cracks or damage to the overflow tube
- A damaged flush valve
- Mineral buildup around the sealing surface
- A damaged flush valve seal
- An incorrectly positioned refill tube
A damaged flush valve or sealing surface can allow water to escape into the bowl even when the flapper appears to be working correctly.
If the problem continues after the basic repairs, the flush valve assembly may need to be replaced.
Step 10: Test the Toilet After the Repair
Don’t assume the repair worked just because the toilet became quieter.
Flush the toilet several times and watch the entire process.
Check that:
- The flapper opens fully.
- The tank refills normally.
- The water stops at the correct level.
- Water does not continuously enter the overflow tube.
- The flapper closes completely.
- You do not hear continuous hissing or trickling.
- Water is not constantly flowing into the bowl.
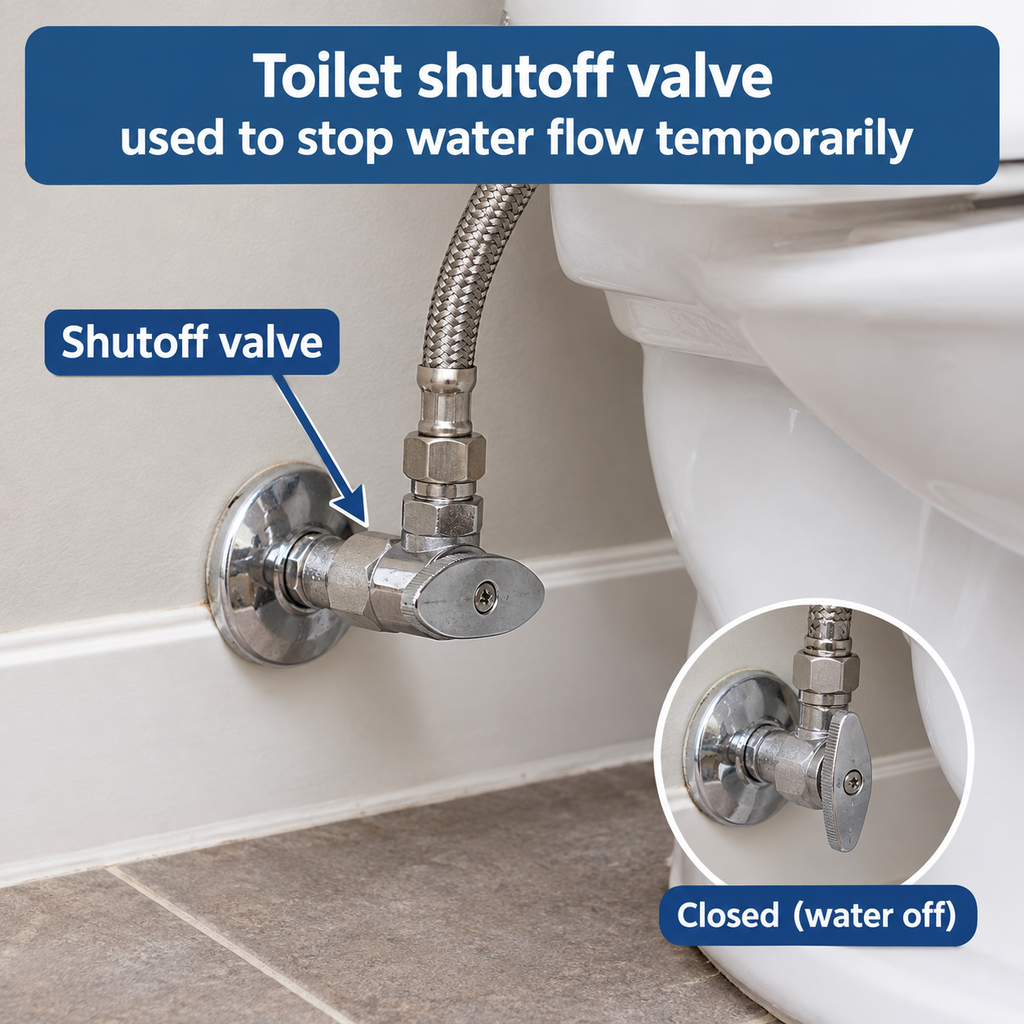
How to Stop a Running Toilet Temporarily
If you cannot repair the toilet immediately, you can stop the water flow by turning off the toilet’s water supply.
The shutoff valve is usually located on the wall or floor near the toilet.
Turn the valve clockwise until the water stops.
This does not fix the underlying problem, but it prevents the toilet from continuously using water while you arrange the repair.
Do not force a shutoff valve that is stuck, badly corroded, or leaking.
When Should You Call a Professional Plumber?
Many running toilets are suitable for DIY repair, but some problems are better handled by a professional.
Consider calling a plumber if:
- The porcelain tank or bowl has a visible crack.
- Water is leaking onto the bathroom floor.
- The shutoff valve is stuck, damaged, or leaking.
- You cannot identify the source of the leak.
- The toilet continues running after basic repairs.
- The flush valve assembly needs replacement and you are not comfortable doing it.
- The toilet has a complicated or unusual flushing mechanism.
If you have a significant external water leak, shut off the water supply if you can do so safely.
Why You Should Fix a Running Toilet
A running toilet may seem like a small problem, but the wasted water can add up quickly.
The EPA says that a leaking toilet can waste up to about 200 gallons of water per day in some circumstances. Even smaller leaks can waste significant amounts of water over time.
Fixing the problem early can reduce unnecessary water use and help prevent a small plumbing problem from becoming a larger one.
How to Prevent a Running Toilet
A few simple maintenance habits can help prevent the problem from coming back.
Check for silent leaks
The EPA recommends periodically checking toilets for leaks using food coloring or a dye tablet.
A toilet can leak into the bowl without creating a puddle on the bathroom floor.
Replace worn flappers
Flappers are rubber components that deteriorate over time.
If a flapper becomes cracked, warped, or unable to seal properly, replace it with a compatible part.
Don’t ignore a loose handle
If you have to jiggle the flush handle every time you use the toilet, inspect the handle, chain, and flapper instead of treating the problem as normal.
Watch the water level
Make sure the tank is not continuously filling above its normal water level or sending water into the overflow tube.
Use compatible replacement parts
When replacing a flapper or fill valve, choose a part designed for your toilet model whenever possible.
Frequently Asked Questions
Why does my toilet keep running after I flush?
Common causes include a worn flapper, incorrectly adjusted chain, incorrect water level, or faulty fill valve.
Remove the tank lid and watch what happens while the toilet refills to help identify the cause.
What is the most common cause of a running toilet?
A worn or poorly sealing flapper is one of the most common causes.
However, the exact cause depends on the toilet design and the symptoms you observe.
How do I know if my toilet flapper is bad?
Look for cracks, deterioration, warping, mineral buildup, or a flapper that does not seal completely.
You can also perform the food-coloring test. If colored water appears in the bowl without flushing, the tank is leaking into the bowl.
Why does my toilet run for a few seconds every few minutes?
This usually means water is slowly leaking from the tank into the bowl.
As the tank water level drops, the fill valve turns on briefly to replace the lost water.
A worn flapper or flush valve seal is a common cause.
Can I fix a running toilet myself?
In many cases, yes.
Adjusting the chain or float and replacing a flapper or fill valve are common DIY repairs.
However, cracked porcelain, external leaks, damaged shutoff valves, or complicated repairs may require professional help.
How much water can a running toilet waste?
The amount depends on the size of the leak.
According to the EPA, a leaking toilet can waste up to about 200 gallons of water per day in some circumstances.
Do I need to replace the whole toilet?
Usually not.
A running toilet often needs only a small adjustment or replacement part, such as a flapper or fill valve.
A complete toilet replacement may make sense if the toilet is cracked, badly damaged, inefficient, or repeatedly develops serious problems.
Final Takeaway
Fixing a running toilet doesn’t require guessing or replacing random parts.
Start with a systematic check:
Flapper → Chain → Water Level → Float and Fill Valve → Refill Tube → Test
In many cases, the problem can be solved with a simple adjustment or an inexpensive replacement part.
Having the right Tools & Equipment can also make basic plumbing repairs easier.
Don’t ignore a toilet that keeps running. Even a small internal leak can waste water continuously without leaving a puddle on the bathroom floor.
Find the cause, make the repair, and test the toilet to make sure it stops running when the tank is full.
Knowing how to fix a running toilet can help you solve a common plumbing problem without replacing the entire toilet.